Saturday 21 November 2009

Hexagonal Gift Box - Jewelled Blooms

I've recently been playing with gift boxes and flowers.
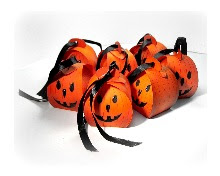
I'm sorry but the colour of this box is very 'punchy' so you may need your sunglasses.
I think I'm missing summer already, I really do hate these dark, wintry days!

CLICK ON IMAGES FOR A CLOSER VIEW
(Put sunglasses on first)

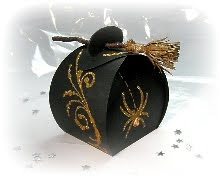
The box measures 45mm high x 85mm wide.
(1 3/4" high x 3 3/8" wide).
I inked the edges of the box and lid with VersaColor 'Burgundy' ink.

The flower centres are made using the Woodware punch 'Splat' - I love that name, sounds like it's straight out of a comic book!
A snowflake punch would work too but it wouldn't sound half so good.

I've included a printable template for the flowers at the end of this post.

Here's how I made them:
I printed the template onto 'Stampin-Up' orange card and cut out two large (layered them together for extra dimension), one medium and one small flower

1)  Using the rounded end of a Sakura gel pen I curled the petals by running the pen from centre to tip of each petal a few times. I used my Wizard embossing mat for support.
2)  Using a small embossing tool I scored three lines on each petal.
3)  I inked the petals lightly, using a piece of sponge and VersaColor Burgundy ink then dabbed the ink pad directly onto the petal tips (to give more depth of colour) and blended using the sponge.
4 & 5)  I curled the petals even more by holding each petal between my thumb and a pricking tool handle and rolling up.
6)  Using the Woodware 'splat' (did I tell you I love that name) punch, I punched from copper mirror board then applied gemstones.
7) Finally I attached this to the flower centre - simply glued it.


The Leaves:
Three layers of fantasy film with some fantasy fibre sandwiched between and ironed to fuse.
The leaves were punched using the Woodware grass punch.
I dimensioned by running my thumbnail down the centre of each leaf and nipping the tips.

Flower - A4 Sheet Download
Click on the image to bring it to full size then save.

There's a downloadable template for this box on 'crafticious'.

Thank you for visiting.
BIG WARM HUGS TO ALL OF YOU!

Thursday 29 October 2009

Exploding Box - Oriental

I made this box purely for pleasure. I was itching to use some new autumnal card stock Mum had brought me on one of her visits to London.
I'm really proud of myself because I didn't use any glitter at all - Boy was that tough!

CLICK ON IMAGES FOR A CLOSER VIEW

The panels are inked with VersaColor - 'Burgundy' then edged with Encore - 'Ultimate Metallic Gold' and embossed with clear embossing powder to give an aged feel.


The stamps I used were Habico Clear 'Chinese Symbols' and EJ 'Butterflies and words'


From the Habico set I stamped the Wisteria in Encore - gold, embossed with 'Mirror Gold' and the chrysanthemums in burgundy then clear embossed.

The flowers are two large daisy punch-outs and the centres are made the same way as in my 'Young Love' flower tutorial.


I highlighted the panel corners, flower centres and the butterflies with liquid pearls 'Golden Gold'. LOVE that stuff but the fine nozzle does tend to block very quickly!

I haven't been making many boxes recently because Mum and I have been busy planning a blog for general paper crafts and cards ranging from basics to advanced things such as three dimensional pop-ups. We'll be posting tutorials, ideas and free downloads/templates. It covers all the other things I'm passionate about as well as boxes.

We've only just added our first post but have lots more to come so hope you have the time to give it a visit. Here's the link: crafticious.

Thank you for taking the time to visit and for being so patient with me - I'll be back soon!


Wednesday 30 September 2009

Exploding Box - Tropical

For Chris who shares my love of tropical gardens - Happy Birthday!

CLICK ON IMAGES FOR A MORE DETAILED VIEW

I used some new Woodware punches I'd bought recently. The tropical leaves are 2" and 1". When I saw them it was love at first sight!

The Lillies are made using a large five petal flower punch, made in the same way as the flowers in the 'Fairies' box.

Couldn't resist adding a few small wooden ladybird embellishments. I applied 'Glossy Acccents' to give them a high shine, I think it makes them more realistic.

The small flowers are made using a small five petal punch and I cut 'Vs' from the petal tips. After cutting to the centre, between two petals, I rolled and glued them. They're made from yellow card, chalked with orange highlights.


I wanted a stamped, leafy background so made a stamp from craft foam:

  • Take what's left from the punch out of the 1" tropical leaf.
  • Using a pen, trace the shape onto a piece of thin craft foam.
  • Cut the leaf out.
  • Attach to an acrylic block using a glue stick.
  • Ink up and stamp (I used VersaColor Fresh Green).
I mostly used punches on this box - here's a list of the ones I used:
  • 1.25" five petal flower punch
  • 5/8" five petal flower punch
  • Woodware 'grass one' 1.5" punch
  • Woodware (tropical leaf) 'Monstera' 1" punch (used to make the stamp)
  • Woodware (tropical leaf) 'Monstera' 2" punch
Thank you for visiting!


Saturday 20 June 2009

Exploding Box - Scottish Butterflies

Sorry - where did this last month go!!***? I seem to have been very busy but not a lot to show for it.
Anyways - here's my latest box:
I was asked to make a magic box - butterflies with a Scottish 'twist'.

CLICK ON IMAGES FOR A CLOSER VIEW
I decided to incorporate the Scottish national flower - thistle.

Outside panels.Closer detail of the butterflies and thistle panels.


Will be adding more details shortly.....


Thanks for popping by and for all your lovely comments - they mean a lot!

Wednesday 13 May 2009

Exploding Box - Butterflies & Ferns

Here's the box I made for Phyllis.
It's similar to my earlier box (in March) but the background is stamped with ferns.
The stamped panels are mounted onto pearlescent green card.
The third and final mount is black card edged with black, holographic, ultra-fine glitter.

I added small, green acrylic gems to the bodies of the butterflies, three per butterfly.

The butterflies were stamped using VersaFine Onyx Black, embossed in clear embossing powder and coloured with Marvey Le Plume pens.
I stamped and coloured both sides of the butterflies, but only embossed the top surface.
They're highlighted with crystal glitter which gives more impact when the box has just dropped open and the butterflies are 'dancing'.

Thanks for popping by

Saturday 9 May 2009

Origami Box shown on Create and Craft TV

Here's the origami box I made for Phyllis for her Create & Craft TV Show.
It's being shown again on Wednesday May 13th at 1.00pm UK time 'EAZI Crafting with Phyllis'.
I also made a butterfly magic box and will be posting pics soon.

I weighted the lid with black glass beads from an old, broken necklace I had. One instance where never throwing anything away paid off!

I stamped in VersaFine Onyx Black and embossed with clear embossing powder.
The edges were tinted using the same VersaFine ink and Tim Holtz's (my Hero) blending tool & felt pads. Phyllis demonstrates this technique brilliantly on her show.
I finished off by running a chunky, permanent black marker round the edge.
I wanted a rich, Gothic feel to this box.

I added panels inside, black card stamped in VersMark Clear ink and embossed with clear embossing powder.

Couldn't resist adding red acrylic gems as a final touch!


Thanks for visiting.

Thursday 7 May 2009

Origami Box with Wrap Lid - Tutorial

This is a tutorial for UK A4 squared but I have tried to explain the principle so it can be applied to any size.
I am aware that Mothers Day is happening in the US, Canada, Australia and many countries this weekend, so am posting this now. I hope the instructions are not too gobble-di-gook!
Despite the long tutorial this box is actually very quick to make, (once you've grasped the principle) so please do have a go.

CLICK ON IMAGES TO SEE FULL SIZE


Open the two pages above, by clicking on them, then 'image save'.

Instructions in Brief
Make the box first - from a square of good quality paper.
Make the wrap from good quality, heavy weight card.
Wrap length: is the same measurement as the paper used to make the box.
Wrap width: is 20mm (7/8") wider than the finished box width.
Score lines on wrap:
1) Mark the centre of the wrap (lengthwise).
2) Measure the height of the finished box.
3) Mark the box height measurement - half either side of the centre point.
If you want to colour tint, stamp or round corners of the wrap - do this before attaching to the box.
Add panels or 3D embellishments after attaching to the box.


This was a 'New Technique Challenge' on Splitcoaststampers.
Here's the link: http://www.splitcoaststampers.com/forums/showthread.php?t=410418

For more examples of origami boxes check out my January postings and Splitcoaststampers Gallery - (there are some fabulous boxes here!)

Thank you for visiting


Friday 24 April 2009

Exploding Box - Fairies

My News:
Create & Craft TV Thursday 30th April at 5pm UK time.
One of my boxes will be shown - it's a chance to see them 'in action'.

Here's the link to the programme info: CreateandCraft TVThe reason I haven't been blogging as much as I would have liked - the wonderful Phyllis from Diamond Card Craft asked if I could design a set of stamps to work with her EAZI SCORE Board. I'm a BIG fan of her boards and was very honoured to be asked. These have now been produced and will be featured on the show.
Am I sounding calm and composed about it all? Because I'm not - I'm so excited I could burst!!! I realy hope you can tune in - the show also goes out live on the net.

Fairies and dragonflies - I've been wanting to make this box for some time now.
CLICK ON IMAGES FOR A CLOSER LOOK


The outside panels each carry a message. You can see the details in the image below.

Here's a closer detail of one of the fairies on the inside panels.

I made the flowers in the same way as I did in the flower tutorial 'Young Love' but I cut a small 'V' in the tip of each petal. The flower centre is made from a piece of acetate cut in the shape of Neptune's fork then glittered.

FLowers:The petals were tinted with Brilliance Pearlescent Lavender and edged with VersaColor Imperial Blue (more purple than blue).
The stamen were made by cutting a small piece of acetate into the shape of Neptune's fork.
I applied a mix of yellow & crystal glitter to the 'fork' then tipped the ends with turquoise glitter.
The flowers were assembled as in the 'Young Love' flower tutorial.
Fairy Panels:I stamped the fairies & ivy, onto cream card, using VersaColor Smoke Blue.
I then ran the ink pad round the edges and chalked with turquoise and lilac.
The ivy veins were highlighted with crystal glitter and I finished by dotting turquoise glitter to give the impression of berries.
I designed the fairy stamps myself .

Thank you for taking the time to visit.

Friday 27 March 2009

Mother's Day - Origami Box and Card

Thank you all so much for visiting and leaving such lovely comments, I'm really looking forward to visiting all of your blogs.

I'm sorry it's been a while since I posted but the last couple of weeks have been very busy. I have some news to share with you very soon.

Here's what I did for Mother's Day. The photographs are a little 'rainy day' but the colours are so bright that it's maybe a good thing! Mum loves bright colours and one of her favourite flowers is the Gerbera Daisy. I decided to make those two things the theme.

This card is large:- 28cm (about 11 inches) x 13.5cm (about 5.5 inches).

CLICK ON IMAGES TO GET A CLOSER VIEW

For the background I chalked the sky, and the grass area is green lightweight card embossed on the Eazi Score Board. The outside mount is silver holographic mirror board.

I used Word-Art (on my computer) to make the letters and printed them out - mirrored. I then cut and glued them onto heavy weight card, cut out, tinted with pigment inks, then embossed with holographic embossing powder. They're attached to the card using 3mm 3D foam pads.


The origami box is made from an A4 sheet of paper (squared) and a strip of card, for the wrap around, again inked and embossed with holographic embossing powder.


The message inside the box is an Elusive Images stamp - 'Words of Inspiration' - "Imagine the possibilities". Stamped using VersaFine - Onyx Black.


I made an insert by printing a message from my computer, "Happy Mother's Day" and finished by attaching a small bee, made by stamping the EJ Honey Bee onto acetate and card - as in the Buttercups and Daisies exploding box.


The Gerbera were made using a large and a small daisy punch. Three punch-outs of each size, layered together. I dry embossed a line along the centre of the petals before assembling the flowers. The centres were finished off with a small amount of black holographic glitter.


I'm drawing up a tutorial for the origami box using UK A4 squared and will post it very soon.

Click here -Tutorial now posted

Thank you for popping by.